Implementing a Skip List in Go
The skip list is an in-memory data structure that uses probabilistic balancing to provide efficient insert, delete, and search capabilities in O(log n) average time. It was first introduced by computer scientist William Pugh back in 1990 as a possible lighter alternative to balanced binary search trees.
Skip lists achieve their efficiency by employing multiple layers of sorted linked lists stacked on top of each other, where each layer acts as an express lane to skip over a certain number of elements from the preceding layers. Compared to traditional linked lists, this allows for faster traversal and permits insertion and deletion at arbitrary positions with significantly reduced time complexity.

Without requiring expensive rebalancing operations, skip lists are much easier to implement and comprehend compared to balanced binary search trees and find wide usage in modern database management systems, such as Apache Cassandra or CockroachDB. These databases leverage skip lists as a fundamental building block in their underlying storage engines, using them for the implementation of memtables (another in-memory data structure that batches up write operations before they are flushed to disk in the form of SSTables).
In today's article, we will implement a skip list in Go and explore its basic functionality and use cases. Let's go!
Laying the Foundations
For starters, let's define our basic building blocks. A skip list consists of nodes. Each node stores a key-value pair. Once a node is inserted into the list, its key can be used to retrieve the value. On each layer, nodes are sorted by key (usually in ascending order), and each node maintains what we call a "tower". Essentially, the tower is a collection of forward pointers linking the node to subsequent nodes on each corresponding level of the skip list.
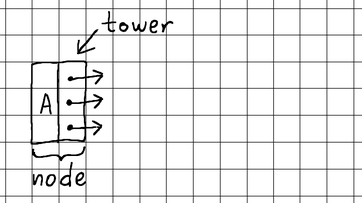
The main skip list structure itself consists of nothing more than a reference to the starting head node and information about the total number of levels that all nodes are currently occupying.
Expressed in Go, this reads:
package skiplist

const (
	MaxHeight   = 16
)

type node struct {
	key   []byte
	val   []byte
	tower [MaxHeight]*node
}

type SkipList struct {
	head   *node
	height int
}
skiplist.go
Here, the MaxHeight constant determines the maximum number of levels that we would like our skip list to support. I picked the number 16, only because this is the number applied in the original skip list paper. However, you can make a more educated choice by plugging your specific values into the following formula:
MaxHeight = log1/p(N)
pis the fraction of nodes with levelipointers that also have leveli+1pointers; for example, whenp = 1/2we are saying that we want 50% (1/2) of the nodes occupying a specific level to also occupy the next level, etc. (more on this later).Nis the predicted maximum number of nodes that you expect to store in the skip list.
In our case, we want each higher level to contain roughly 50% of the nodes occupying the previous level, and we expect to accommodate around 65 536 nodes at most (this number was again suggested in the original paper, and we use it here for easier calculations, but you can feel free to tailor it to your needs).
The end result is:
p = 50% = 1/2
N = 65536 = 216
MaxHeight = log1/p(N) = log1/(1/2)(216) = log2(216) = 16
Initializing the Skip List
To initialize our skip list, we start by creating an empty head node with a tower that points to nil on all levels. Essentially, this node serves as a sentinel node. We are choosing this approach, because it allows us to substantially simplify our implementation, eliminating the need to litter our methods with null checks. This makes our code much more manageable, compact, and easier to read.
For similar reasons, we set the initial height to 1, noting the fact that, by design, all inserted nodes should occupy the very first level of a skip list. In other words, the first level is always in use, and a skip list with 0 height simply makes no sense.
func NewSkipList() *SkipList {
	sl := &SkipList{}
	sl.head = &node{}
	sl.height = 1
	return sl
}
skiplist.go
Searching a Skip List
Searching is the most essential operation in the skip list. Neither insertion nor deletion can be implemented without a working search algorithm.
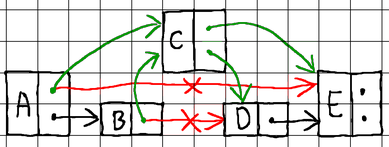
To insert a new node, we need to locate suitable neighboring nodes on all levels to splice the new node with:
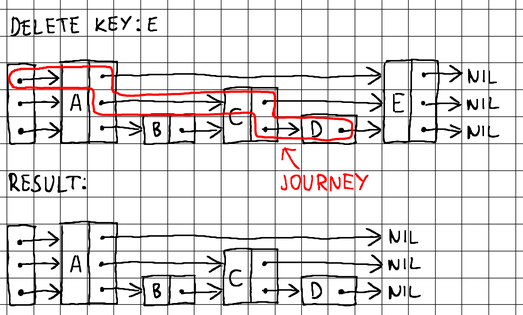
To delete an existing node, we need to find its current neighboring nodes on all levels, break ties with them, and then splice the neighbors together to seal the gap:
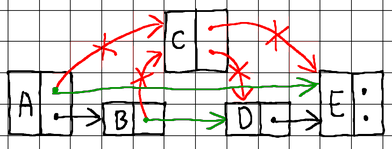
As we already said, nodes in a skip list are sorted by key in ascending order. With that understanding, our search algorithm begins by comparing the requested key against the keys of nodes located at the highest level of the skip list, starting from the head node. As long as the requested key is greater than the key of the node currently being evaluated, we keep advancing our pointer to the next node on the current level. If the requested key is, however, smaller or equal, we move down to a lower level. This process continues until we reach the lowest level of the skip list, either finding a node with a matching key or not.
To splice a node with its neighboring nodes (during insertion) or split a node from its neighboring nodes (during deletion), we need to know its immediate predecessor on each level. Therefore, when searching, it is a good idea to keep track of the nodes that we pass through as we descend from level to level. For that purpose, we maintain an additional array of pointers to track our journey:
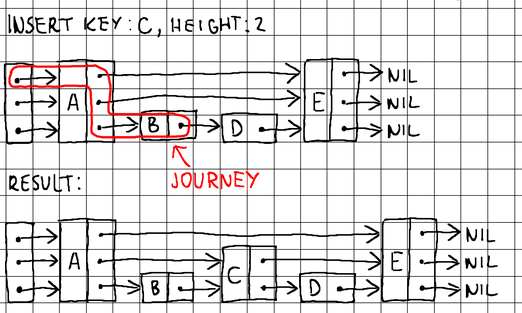
By using the journey array, we can easily perform pointer updates and splice any node into the skip list during insertion or deletion. We implement a more generic search() method to be able to reuse its logic during insertion and deletion, and export a more specific Find() method for finding the precise value residing at a requested key.
The entire code reads:
func (sl *SkipList) search(key []byte) (*node, [MaxHeight]*node) {
	var next *node
	var journey [MaxHeight]*node

	prev := sl.head
	for level := sl.height - 1; level >= 0; level-- {
		for next = prev.tower[level]; next != nil; next = prev.tower[level] {
			if bytes.Compare(key, next.key) <= 0 {
				break
			}
			prev = next
		}
		journey[level] = prev
	}

	if next != nil && bytes.Equal(key, next.key) {
		return next, journey
	}
	return nil, journey
}

func (sl *SkipList) Find(key []byte) ([]byte, error) {
	found, _ := sl.search(key)

	if found == nil {
		return nil, errors.New("key not found")
	}

	return found.val, nil
}
skiplist.go
Choosing a Random Height
In line with the original skip list paper, we have to randomly generate a height for every new node before inserting it into the list. Earlier, when introducing the MaxHeight formula, we mentioned the value p denoting the fraction of nodes with level i pointers that we also want to have level i+1 pointers:
MaxHeight = log1/p(N)
We settled for the value p = 1/2 (which is equivalent to 50%). To comprehend this choice, it is necessary to understand that this decision expresses our desire for roughly 50% of the nodes occupying level 0 to also occupy level 1, 50% of the nodes occupying level 1 to also occupy level 2, 50% of the nodes occupying level 2 to also occupy level 3, and so on and so forth, until we reach the maximum level.
Let's assume that we are working with a random number generator that returns uint32 values, which we use to seed a pseudo-random height generation algorithm. This implies that every call has an equal probability of returning a random integer in the range [0, 4_294_967_295]. Consequently, we can assign a specific height to each generated integer and apply probability calculations to group the integers into sub-ranges, each corresponding to a different height.
Remember that by design all nodes in a skip list occupy its lowest level (level 0). This means that all integers in the range [0, 4_294_967_295] should occupy level 0 (i.e., have a height >= 1). Since p = 1/2, this means that 50% of the nodes occupying level 0, should also occupy level 1 (i.e., their height should be > 1). To satisfy this requirement, we can split our range in two equal parts, and state that integers in the range [2_147_483_648, 4_294_967_295] correspond to a height of 1, while integers in the range [0, 2_147_483_647] have a height that is > 1.
Continuing further, we use the same reasoning for levels 1 and 2. 50% of the nodes on level 1 should also be on level 2, so we split the [0, 2_147_483_647] range into two smaller ranges, and state that integers in the range [1_073_741_824, 2_147_483_647] have a height of 2, while integers in the range [0, 1_073_741_823] have a height > 2.
We repeat this process until we reach the MaxHeight of our skip list. Effectively, this builds an array of probabilities that we can use to determine the height of a new node:
// Key is the level number
// Value is the upper bound of the range for that level
var p [MaxHeight]uint32

p[0] = 4294967295 // height = 1
p[1] = 2147483647 // height = 2
p[2] = 1073741823 // height = 3
p[3] = 536870911  // height = 4
p[4] = 268435455  // height = 5
p[5] = 134217727  // height = 6
p[6] = 67108863   // height = 7
p[7] = 33554431   // height = 8
p[8] = 16777215   // height = 9
p[9] = 8388607    // height = 10
p[10] = 4194303   // height = 11
p[11] = 2097151   // height = 12
p[12] = 1048575   // height = 13
p[13] = 524287    // height = 14
p[14] = 262143    // height = 15
p[15] = 131071    // height = 16
Sample representation of a mapping between integer ranges to node heights.
The probability array can be generated like this:
const (
	MaxHeight = 16
	PValue    = 0.5 // p = 1/2
)

var probabilities [MaxHeight]uint32

// ...

func init() {
	probability := 1.0

	for level := 0; level < MaxHeight; level++ {
		probabilities[level] = uint32(probability * float64(math.MaxUint32))
		probability *= PValue
	}
}
skiplist.go
We can use runtime.fastrand as our random number generator (performance metrics obtained from various benchmarks reveal that runtime.fastrand crushes math/rand in terms of performance, so many library authors recognize it as the obvious choice for generating random integers in their programs).
package fastrand

import _ "unsafe" // required by go:linkname

//go:linkname Uint32 runtime.fastrand
func Uint32() uint32
fastrand.go
We can then define our pseudo-random height generation algorithm as follows:
func randomHeight() int {
	seed := fastrand.Uint32()

	height := 1
	for height < MaxHeight && seed <= probabilities[height] {
		height++
	}

	return height
}
skiplist.go
The loop intentionally starts at height = 1, because every node in the skip list occupies its lowest level, effectively giving it a height of 1.
Inserting Data
We can finally define our data insertion algorithm. As we already discussed, insertion entails searching and splicing. Given a requested key, we determine whether a node with that key exists in the skip list or not, tracking our journey along the way (i.e., we perform a search).
If a node with the requested key already exists in the list, there are several possibilities:
- We can swap out its current value for the newly supplied value.
- We can deny the insertion and report a duplicate key error.
- We can insert a new node bearing the same key but with the newly supplied value.
All three options are viable. Everything depends on the specific use case. For the sake of simplicity, we constrain our implementation to swapping out the current value with the newly supplied value.
If a node with the requested key does not exist in our skip list, the algorithm takes the following steps:
- Invoke our pseudo-random height generation algorithm to determine the node height.
- Allocate memory for the node, and set its key and value.
- Backtrack the
journeyarray to determine the node neighbors and splice the node with them.
Since our pseudo-random algorithm may end up generating a height that's greater than the current height of the skip list, as a very last step, we make sure that the correct height is reflected in the main skip list data structure after a potential expansion has occurred.
The final code looks like this:
func (sl *SkipList) Insert(key []byte, val []byte) {
	found, journey := sl.search(key)

	if found != nil {
		// update value of existing key
		found.val = val
		return
	}
	height := randomHeight()
	nd := &node{key: key, val: val}

	for level := 0; level < height; level++ {
		prev := journey[level]

		if prev == nil {
			// prev is nil if we are extending the height of the tree,
			// because that level did not exist while the journey was being recorded
			prev = sl.head
		}
		nd.tower[level] = prev.tower[level]
		prev.tower[level] = nd
	}

	if height > sl.height {
		sl.height = height
	}
}
skiplist.go
Deleting Data
In terms of complexity, deletion is not much different than insertion. Once again, given a requested key, we determine whether a node with that key exists in the list or not, and track our journey along the way (i.e., we perform a search).
If a node with the requested key doesn't exist in the skip list, we can either raise an error or simply return from the method call. Again, this is a matter of preference, and in our implementation, we choose to return a boolean false value without raising any errors.
If a node with the requested key already exists in the skip list, we backtrack the journey array, looking for nodes neighboring the node requested for deletion. We then split the node requested for deletion from its neighbors and splice its former neighbors together to seal any gaps.
Lastly, we iterate the list headers on each level to check whether the removed node was the only node residing on that particular level of the skip list. If that's the case, we reflect the change by reducing the height recorded in the main skip list data structure.
func (sl *SkipList) Delete(key []byte) bool {
	found, journey := sl.search(key)

	if found == nil {
		return false
	}

	for level := 0; level < sl.height; level++ {
		if journey[level].tower[level] != found {
			break
		}
		journey[level].tower[level] = found.tower[level]
		found.tower[level] = nil
	}
	found = nil
	sl.shrink()

	return true
}

func (sl *SkipList) shrink() {
	for level := sl.height - 1; level >= 0; level-- {
		if sl.head.tower[level] == nil {
			sl.height--
		}
	}
}
skiplist.go
Testing our Skip List
We wrote a substantial amount of code, all of which is available for you to review and examine in our official Git repository over here:
 cloudcentricdev
There's more, though. In addition to the main skip list implementation, the repository also contains a skip list visualizer (see visualizer.go). We rely on the visualizer to provide all the functionality necessary to have our skip list implementation comply with the Stringer interface so that it can be printed for debugging purposes using standard fmt.Println() calls.
func (sl *SkipList) String() string {
	v := &visualizer{sl}
	return v.visualize()
}
skiplist.go
A sample visualization looks like this:
L03 ----------------------> foo
L02 --------> bar --------> foo -> qux
L01 -> abc -> bar --------> foo -> qux -> xyz
L00 -> abc -> bar -> baz -> foo -> qux -> xyz
Sample visualization of a skip list created by the visualizer.
In the Git repository, you will also find an interactive command line interface that you can use to experiment with skip lists (see cli.go). The CLI can be a valuable tool for enhancing your learning experience and perfecting your understanding of skip lists. As you insert and delete nodes, the CLI uses the visualizer to show you the structural changes occurring in the list.
The CLI exposes the following commands:
 SET <key> <val> Insert a key-value pair into the SkipList
 DEL <key>       Remove a key-value pair from the SkipList
 GET <key>       Retrieve value corresponding to key from the SkipList
 EXIT            Terminate the current session
Here is a quick preview:

Even though it is presumably quite interesting, we won't examine how the CLI and the visualizer are implemented. I feel that doing so will divert our attention too far away from the main topic. However, I encourage you to look through the official repository and delve into the source code to learn more about these topics.
I hope this post was informative and helpful. If you have any further questions or need clarification on anything discussed, feel free to reach out.